# Welcome to Annotate Lab

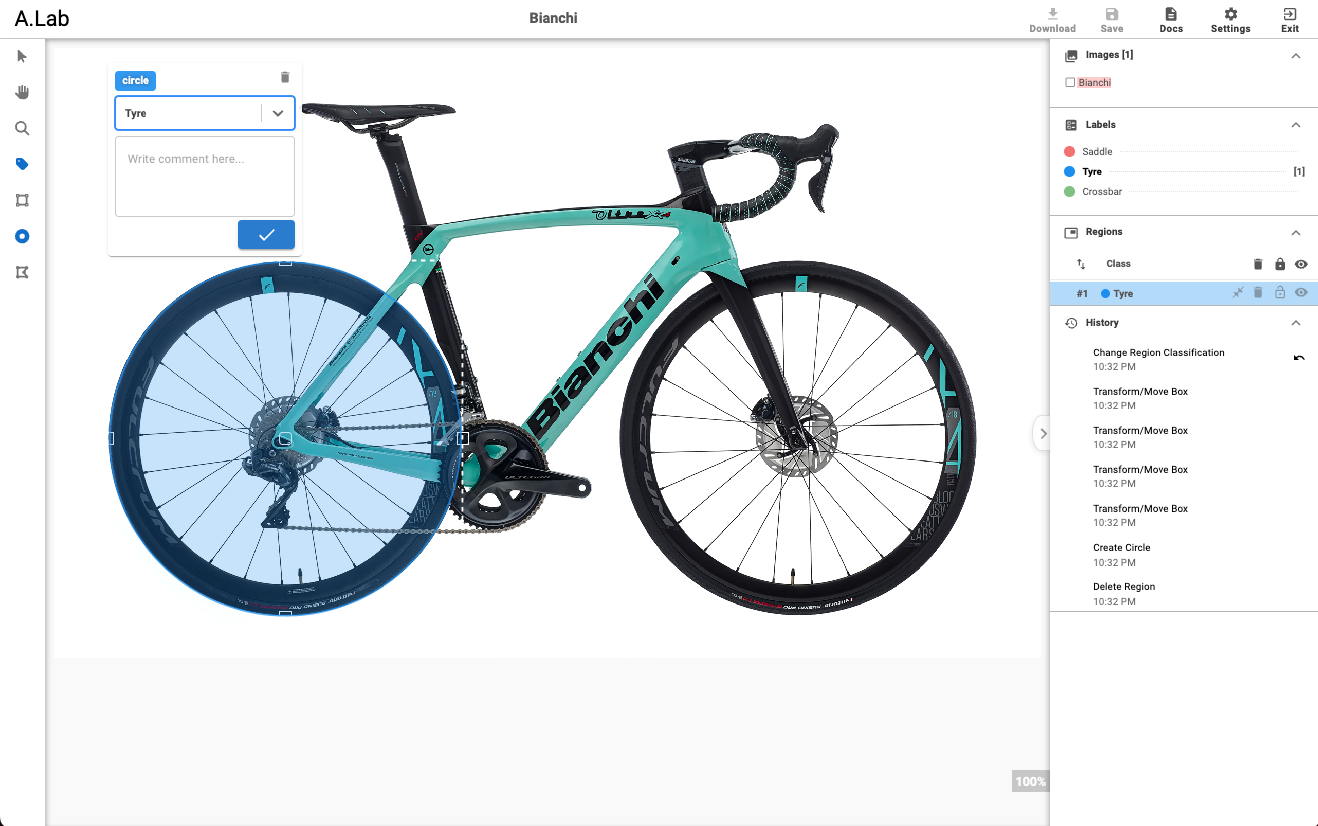
Annotate-Lab is an open-source application designed for image annotation, comprising two main components: the client and the server. The client, a React application, is responsible for the user interface where users perform annotations. On the other hand, the server, a Flask application, manages persisting the annotated changes and generating masked and annotated images, along with configuration settings. The preview of Annotate Lab interface is shown below.

<figure><img src="/files/hq2Aj3rGUCWuHsmygSHh" alt=""><figcaption><p>Annotation using A.Lab</p></figcaption></figure>

Based on the region tools selected in settings, users can annotate images. The labels are configured in settings along with the images. After annotation is performed, users can download the annotated image, annotation settings, and masked images from the download button. The history section on the right sidebar displays the actions performed, which can be reverted. Meanwhile, the regions section shows the annotated regions that can be locked, deleted, or hidden.

The images section displays the number of images, while the classifications section shows the available labels.

Github Link: <https://github.com/sumn2u/annotate-lab>

{% embed url="<https://youtu.be/iUI6MKWqCeg>" %}
A.Lab Annotation Example
{% endembed %}

## Quick links

{% content-ref url="/pages/zatALf230PMXuM6oY0J9" %}
[Key Features](/overview/key-features)
{% endcontent-ref %}

## Get Started

We've put together some helpful guides for you to get setup with our tools quickly and easily.

{% content-ref url="/pages/oUWomRZLlydpfGcf0ulo" %}
[Set up and Run](/fundamentals/set-up-and-run)
{% endcontent-ref %}

{% content-ref url="/pages/t1fri5hQA7wTAdSweW78" %}
[Configuration](/fundamentals/set-up-and-run/configuration)
{% endcontent-ref %}

{% content-ref url="/pages/EYaQJKsVWepdZ5YHVlJ0" %}
[Annotating Images](/fundamentals/set-up-and-run/annotating-images)
{% endcontent-ref %}


# Key Features

* Easy image upload and annotation
* Supports multiple annotation types
* Allows downloading annotated, masked, and annotated images structure
* Internationalization support&#x20;
* User-friendly interface
* Configurable settings
* Support [YOLO  annotation formats](https://docs.ultralytics.com/datasets/detect/#ultralytics-yolo-format)

  <br>


# Project Structure

The tree structure of project is shown below.

```
annotation-lab/
├── client/
│   ├── public/
│   ├── src/
│   ├── package.json
│   └── ... (other React app files)
├── server/
│   ├── db/
│   ├── tests/
│   ├── app.py
│   ├── requirements.txt
│   └── ... (other Flask app files)
├── README.md
```

### Client

The client is a react application responsible for rendering UI. It contains following folders.

* **public/**: Static files and the root HTML file.
* **src/**: React components and other frontend code.
* **package.json**: Contains client dependencies and scripts.

### Server

The server is responsible for persisting information such as images and the working state for future usage. It is also responsible for masking  and creating configuration of preserved image. It contains following folders.

* **db/**: Database-related files and handlers.
* **tests/**: Test files to test the apis.
* **app.py**: Main Flask application file.
* **requirements.txt**: Contains server dependencies.

### Dependencies

#### Client

* [React](https://react.dev/)
* [Axios](https://axios-http.com/)
* Other dependencies as listed in `package.json`

#### Server

* [Flask](https://flask.palletsprojects.com/en/3.0.x/)
* [Pandas](https://pandas.pydata.org/)
* [NumPy](https://numpy.org/)
* Other dependencies as listed in `requirements.txt`


# Customization

Configuration files can be found on both `client` and `server` folder. In client the `config.js` file can be found inside the **src** folder and  is responsible for the client side configuration whereas for server its `config.py` in the root directory.

### **Configurable parameters in Client:**

<table><thead><tr><th>Parameter</th><th>Description</th></tr></thead><tbody><tr><td><pre><code>DOCS_URL
</code></pre></td><td>URL link of the documentation.</td></tr><tr><td><pre><code>SERVER_URL
</code></pre></td><td>URL link of the server where the server application is running.</td></tr><tr><td><pre><code><strong>UPLOAD_LIMIT
</strong></code></pre></td><td>Number of images one can upload in Configuration.</td></tr><tr><td><pre><code>OUTLINE_THICKNESS_CONFIG : {
      POLYGON: 2,
      CIRCLE: 2,
      BOUNDING_BOX: 2
    }
</code></pre></td><td>Controls the outline thickness of the tools</td></tr><tr><td><pre><code>SHOW_CLASS_DISTRIBUTION
</code></pre></td><td>Displays annotated class distribution bar chart</td></tr><tr><td><pre><code>SAM_MODEL_ENABLED
</code></pre></td><td>Displays button that allow auto bounding box selection using SAM</td></tr></tbody></table>

### **Configurable parameters in Server:**

<table><thead><tr><th>Parameter</th><th>Description</th></tr></thead><tbody><tr><td><pre><code>MASK_BACKGROUND_COLOR
</code></pre></td><td>Background color used while downloading masked image</td></tr><tr><td><pre><code>SAM_MODEL_ENABLED
</code></pre></td><td>Support auto bounding box selection using SAM</td></tr></tbody></table>


# Installation

#### 1. Clone the Repository

Open a terminal or command prompt and clone the repository using Git:

```bash
git clone https://github.com/sumn2u/annotate-lab.git
```

#### 2. Navigate to the Project Directory

Move into the cloned directory:

```bash
cd annotate-lab
```


# Set up and Run

The following sections cover setting up the client and server, as well as running the application.

### Client Setup

<details>

<summary>Step 1: Navigate to the <mark style="color:blue;">client</mark> directory:</summary>

```bash
cd client
```

</details>

<details>

<summary>Step 2: Install the dependencies:</summary>

```bash
npm install
```

</details>

<details>

<summary>Step 3: Starting the application:</summary>

```bash
npm start
```

</details>

The application should now be running on [http://localhost:5173](http://localhost:5173/).

### Server Setup

<details>

<summary>Step 1: Navigate to the <mark style="color:blue;">server</mark> directory:</summary>

```bash
cd server
```

</details>

<details>

<summary>Step 2: Create and activate a virtual environment:</summary>

```bash
python3 -m venv venv

source venv/bin/activate  # On Windows use `venv\Scripts\activate`
```

</details>

<details>

<summary>Step 3: Install the dependencies:</summary>

```bash
pip install -r requirements.txt
```

</details>

<details>

<summary>Step 4: Start the application:</summary>

```bash
flask run
```

</details>

The server should now be running on [http://localhost:5000](http://localhost:5000/).

### &#x20;Running using Docker.

Navigate to the root directory and run the following command to start the application:

```bash
docker-compose build
docker-compose up -d #running in detached mode
```

This should boot the applications and the UI can be accessed via  <http://localhost>.


# Configuration

One can configure the tools, tags, upload images, and more from the settings. Initially, we need to provide the task information, where we can select the task type. One can configure the tools, tags, upload images, and more from the configuration. Below are the tabs that reflects the configuration tabs.

{% tabs %}
{% tab title="Task Info" %}
&#x20;Initially, we need to provide the task information, where we can select the task type.

<figure><img src="/files/vOTPT75xM7P2YvmYvjJJ" alt=""><figcaption><p>Setup Configuration</p></figcaption></figure>

The *dark* and *light* mode can be configured from here.
{% endtab %}

{% tab title="Configuration" %}
In configuration tab  we provide the tools, labels, and region types information.  This will be used while doing annotation and can be modified at any points.

<figure><img src="/files/thSlcoOzHM3gJdAp6Tw3" alt=""><figcaption><p>Configuration Setting</p></figcaption></figure>

After filling these information, we are allowed to go to next tab.&#x20;
{% endtab %}

{% tab title="Image" %}
In this tab, we upload images. Currently, only two image of <mark style="color:blue;">.jpg</mark>, <mark style="color:blue;">.jpeg</mark> and <mark style="color:blue;">.png</mark> extensions are allowed. After providing the information, user can navigation to annotation section. By default 500 images can be uploaded once but these numbers can be [customized](/overview/customization#configurable-parameters-in-client).

<figure><img src="/files/dg9Li1PAMgUnVrU5YFKR" alt=""><figcaption><p>Image Upload</p></figcaption></figure>
{% endtab %}
{% endtabs %}


# Annotating Images

The blueprint of the annotate lab and example of bicycle annotation is shown below.

<figure><img src="/files/XOfNRkVaAPAJdRjvU1IR" alt=""><figcaption><p>Annotation Blueprint</p></figcaption></figure>

At the top, users will find details about the uploaded image, along with a download button on the right side, enabling them to download the annotated image, its settings, and the masked image. To preserve their current work, users can use the save button, which saves their progress. Finally, the exit button allows users to exit the application.

\
The left sidebar (tools) contains sets of tools available for annotation, sourced from the configuration that was set up. The "Select," "Drag/Pan," "Zoom In/Out," and "Show/Hide Tags" are present by default.

The right sidebar contains four sections: files, labels, regions, and history. The files section lists the uploaded images and allows users to navigate and save current stage changes. The labels section contains the list of labels, enabling users to select their desired label to apply it to the annotated region. The regions section lists annotated regions, where users can delete, lock, or hide selected regions. The history section shows action histories and offers a revert functionality to undo changes.

<figure><img src="/files/B2bwnxP0wmMIqIYgIn9i" alt=""><figcaption><p>Annotating Orange</p></figcaption></figure>

Between the left and right sidebars, there's a workspace section where the actual annotation takes place. Sample of annotated image along with its mask and settings is show below.

<figure><img src="/files/v8g7NWTbbVKixk60FJZr" alt=""><figcaption><p>Orange Annotation</p></figcaption></figure>

<figure><img src="/files/NzHpA4o0PVTAD96uPoFJ" alt=""><figcaption><p>Mask of the Orange Annotated Image</p></figcaption></figure>

```json
{
   "orange.png":{
      "configuration":[
         {
            "image-name":"orange.png",
            "regions":[
               {
                  "region-id":"47643630436867834",
                  "image-src":"http://127.0.0.1:5000/uploads/orange.png",
                  "class":"Orange",
                  "comment":"",
                  "tags":"",
                  "points":[
                     [
                        0.4685613390092879,
                        0.7693498452012384
                     ],
                     [
                        0.6781491873065015,
                        0.6640866873065016
                     ],
                     [
                        0.723921246130031,
                        0.5092879256965944
                     ],
                     [
                        0.7480118034055728,
                        0.34055727554179566
                     ],
                     [
                        0.5841960139318886,
                        0.14705882352941177
                     ],
                     [
                        0.41917569659442727,
                        0.13312693498452013
                     ],
                     [
                        0.30113196594427244,
                        0.22755417956656346
                     ],
                     [
                        0.21079237616099072,
                        0.4411764705882353
                     ],
                     [
                        0.26620065789473685,
                        0.6764705882352942
                     ],
                     [
                        0.4011077786377709,
                        0.7879256965944272
                     ]
                  ]
               },
               {
                  "region-id":"5981359766055432",
                  "image-src":"http://127.0.0.1:5000/uploads/orange.png",
                  "class":"Apple",
                  "comment":"",
                  "tags":"",
                  "x":[
                     0.1770655959752322
                  ],
                  "y":[
                     0.11764705882352941
                  ],
                  "w":[
                     0.5854005417956657
                  ],
                  "h":[
                     0.6981424148606811
                  ]
               }
            ],
            "color-map":{
               "Orange":[
                  244,
                  67,
                  54
               ],
               "Apple":[
                  33,
                  150,
                  243
               ]
            }
         }
      ]
   }
}
```

One can also use shortcuts to speed up the annotation process.

<figure><img src="/files/4CTkqLlJVN5TLugxZwrE" alt=""><figcaption><p>Shortcuts in Annotate Lab</p></figcaption></figure>


# Outputs

One can download the annotated image into various formats. Following are the examples of annotated image of an orange.

<figure><img src="/files/v8g7NWTbbVKixk60FJZr" alt=""><figcaption><p>Annotated Image</p></figcaption></figure>

<figure><img src="/files/iYuqgpFE7RgTJHsQLbXz" alt=""><figcaption><p>Masked of Annotated Image</p></figcaption></figure>

The configuration can be downloaded using built in configuration or using YOLO format.

```json
{
   "orange.png":{
      "configuration":[
         {
            "image-name":"orange.png",
            "regions":[
               {
                  "region-id":"47643630436867834",
                  "image-src":"http://127.0.0.1:5000/uploads/orange.png",
                  "class":"Orange",
                  "comment":"",
                  "tags":"",
                  "points":[
                     [
                        0.4685613390092879,
                        0.7693498452012384
                     ],
                     [
                        0.6781491873065015,
                        0.6640866873065016
                     ],
                     [
                        0.723921246130031,
                        0.5092879256965944
                     ],
                     [
                        0.7480118034055728,
                        0.34055727554179566
                     ],
                     [
                        0.5841960139318886,
                        0.14705882352941177
                     ],
                     [
                        0.41917569659442727,
                        0.13312693498452013
                     ],
                     [
                        0.30113196594427244,
                        0.22755417956656346
                     ],
                     [
                        0.21079237616099072,
                        0.4411764705882353
                     ],
                     [
                        0.26620065789473685,
                        0.6764705882352942
                     ],
                     [
                        0.4011077786377709,
                        0.7879256965944272
                     ]
                  ]
               },
               {
                  "region-id":"5981359766055432",
                  "image-src":"http://127.0.0.1:5000/uploads/orange.png",
                  "class":"Apple",
                  "comment":"",
                  "tags":"",
                  "x":[
                     0.1770655959752322
                  ],
                  "y":[
                     0.11764705882352941
                  ],
                  "w":[
                     0.5854005417956657
                  ],
                  "h":[
                     0.6981424148606811
                  ]
               }
            ],
            "color-map":{
               "Orange":[
                  244,
                  67,
                  54
               ],
               "Apple":[
                  33,
                  150,
                  243
               ]
            }
         }
      ]
   }
}

```

### **YOLO Format**

[YOLO format](https://docs.ultralytics.com/datasets/detect/#ultralytics-yolo-format) is also supported by A.Lab. Below is an example of annotated ripe and unripe tomatoes. In this example, `0` represents ripe tomatoes and `1` represents unripe ones.

<figure><img src="/files/ogtD9vh1uirB2nNIxk18" alt=""><figcaption><p>Tomatoes Image</p></figcaption></figure>

Annotating it in A.Lab.

<figure><img src="/files/DXvDw0UDhriRB42E6zrR" alt=""><figcaption><p>Annotating Tomatoes</p></figcaption></figure>

The label of the above image are as follows:

```
0 0.213673 0.474717 0.310212 0.498856
0 0.554777 0.540507 0.306350 0.433638
1 0.378432 0.681239 0.223970 0.268879
```

Applying the generated labels we get following results.

<figure><img src="/files/tBTKqhFtAwNmpdrlpLFW" alt=""><figcaption><p>Annotated Tomatoes using Label values</p></figcaption></figure>

### Normalization process of YOLO annotations

**Example Conversion**

To convert non-normalized bounding box coordinates (xmax, ymax, xmin, ymin) to YOLO format (xcenter, ycenter, width, height):

<figure><img src="/files/lOgQTRor4ibInjZkVfCu" alt=""><figcaption><p>YOLO Annotation Normalization (Credit: Leandro de Oliveira)</p></figcaption></figure>

```python
# Assuming row contains your bounding box coordinates
row = {'xmax': 400, 'xmin': 200, 'ymax': 300, 'ymin': 100}
class_id = 0  # Example class id (replace with actual class id)

# Image dimensions
WIDTH = 640  # annotated image width
HEIGHT = 640  # annotated image height

# Calculate width and height of the bounding box
width = row['xmax'] - row['xmin']
height = row['ymax'] - row['ymin']

# Calculate the center of the bounding box
x_center = row['xmin'] + (width / 2)
y_center = row['ymin'] + (height / 2)

# Normalize the coordinates
normalized_x_center = x_center / WIDTH
normalized_y_center = y_center / HEIGHT
normalized_width = width / WIDTH
normalized_height = height / HEIGHT

# Create the annotation string in YOLO format
content = f"{class_id} {normalized_x_center} {normalized_y_center} {normalized_width} {normalized_height}"
print(content)
```

The above conversion will give us YOLO format string.

```txt
0 0.46875 0.3125 0.3125 0.3125
```

### **COCO Format**

[COCO JSON format](https://roboflow.com/formats/coco-json) is also supported by A.Lab. Below is an example of annotated ripe and unripe tomatoes. In this example, `0` represents ripe tomatoes and `1` represents unripe ones.

```json
{
  "info": {
    "description": "COCO Format Annotations",
    "url": "http://127.0.0.1:5000/",
    "version": "1.0",
    "year": 2026,
    "contributor": "Annotate Lab",
    "date_created": "2026-03-25T23:43:54.234369"
  },
  "licenses": [
    {
      "id": 1,
      "name": "Unknown",
      "url": ""
    }
  ],
  "images": [
    {
      "id": 1,
      "file_name": "glass_543.jpg",
      "width": 474,
      "height": 840,
      "license": 1,
      "date_captured": "2026-03-25T23:43:54.240259",
      "original_name": "glass_543"
    }
  ],
  "annotations": [
    {
      "id": 1,
      "image_id": 1,
      "category_id": 0,
      "bbox": [27.71, 189.24, 147.04, 419.04],
      "area": 61612.0,
      "segmentation": [],
      "iscrowd": 0
    },
    {
      "id": 2,
      "image_id": 1,
      "category_id": 0,
      "bbox": [190.21, 272.89, 145.21, 364.25],
      "area": 52920.0,
      "segmentation": [],
      "iscrowd": 0
    },
    {
      "id": 3,
      "image_id": 1,
      "category_id": 1,
      "bbox": [126.22, 459.97, 106.16, 225.86],
      "area": 23960.0,
      "segmentation": [],
      "iscrowd": 0
    }
  ],
  "categories": [
    {
      "id": 0,
      "name": "ripe",
      "supercategory": "tomato"
    },
    {
      "id": 1,
      "name": "unripe",
      "supercategory": "tomato"
    }
  ]
}
```


# Running Tests

## Client Tests

The client tests are located in the `client/src` directory and utilize `.test.js` extensions. They are built using [Jest](https://jestjs.io/) and [React Testing Library](https://github.com/testing-library/react-testing-library).

**Install Dependencies:**

```bash
cd client
npm install
```

**Run Tests:**

```bash
npm test
```

This command launches the test runner in interactive watch mode. It runs all test files and provides feedback on test results.

## Server Tests

The server tests are located in the `server/tests` directory and are implemented using [unittest](https://docs.python.org/3/library/unittest.html).

**Install Dependencies:**

```bash
cd ../server
python -m venv venv
source venv/bin/activate # On Windows use `venv\Scripts\activate`
pip install -r requirements.txt
```

**Run Tests:**

```bash
python3 -m unittest discover -s tests -p 'test_*.py'

```

This command discovers and runs all test files (`test_*.py`) in the `server/tests` directory using unittest.


# Code Formatting

### Client-side (Vite React Application)

* **Code Formatter:** [Prettier](https://prettier.io/)
* **Configuration File:** `.prettierrc`
* **Command:** Run `npm run format` or `yarn format` to format client-side code using Prettier.

### Server-side (Flask Application)

* **Code Formatter:** [Black](https://pypi.org/project/black/)
* **Configuration File:** `pyproject.toml`
* **Command:** Run `black .` to format server-side code using Black.


# Annotating Bicycle

For an example purpose we will be annotating bicycle image.

### 1. Configuration Setup

<details>

<summary>Step 1: Task Information</summary>

At first, we will  provide the task information. The annotated image will be used for segmentation purpose so image segmentation task is selected here.

<img src="/files/vOTPT75xM7P2YvmYvjJJ" alt="setup configuration" data-size="original">

Then we click next to navigate the next tab.

</details>

<details>

<summary>Step 2: Annotation Configuration</summary>

Now, we will pick the tools that we will require for annotation purpose and also provide the labels name that will be used during annotation.

![](/files/3Ln8QvUv4QFJiWr9YTFW)

Then we click next to navigate the image tab.

</details>

<details>

<summary>Step 3: Upload Image</summary>

Now, we will upload the image that will be used for annotation purpose.&#x20;

![](/files/VpYnbP7yy2qcLySMi0ch)

After uploading the image we can click the open lab and start the annotation.

</details>

### 2. Annotating Image

<details>

<summary>Step 1: Tools Selection</summary>

From the tools selection, we can select the tools that we needed. For example purpose circle tool is selected.

![](/files/ElzL8zBHb9v5GsSk46gb)&#x20;

</details>

<details>

<summary>Step 2: Draw and Fill the information</summary>

The selected tool is draw on top of the region of interest (ROI). For example purpose we will be using it on back tyre.

![](/files/TwjgvxSDRoW8gyjnHCR7)

A popup box will appear. Where we can select the labels from dropdown and provide comments too.&#x20;

![](/files/hdDtDBUu2lkLgosgdqp6)

After entering the information, we can click the checkmark.

</details>

Now, if we look at the right side bar labels section, the <mark style="color:blue;">tyre</mark> label is highlighted and has a count of <mark style="color:purple;">1.</mark> It means that current annotated image has a  single tyre label with it. The regions section has also a new region added whereas the history section has numerous count. One can lock, unlock, delete, hide or resize label from regions section and can revert changes from history section. We can add as many labels we want.&#x20;

<figure><img src="/files/N1YzP2ATJmQjmCEvQS1n" alt=""><figcaption><p>Sidebar</p></figcaption></figure>

To move a selected region, click on the expansion section of the region. This will reveal a grab handle that allows us to adjust the points or drag the region to its new location as needed.

<figure><img src="/files/QuimkphH7CGtKjYkelHZ" alt=""><figcaption><p>Regions expansion / adjustment</p></figcaption></figure>

### 3. Downloading Changes

<details>

<summary>Step 1: Save </summary>

Save the current change by clicking the Save button from Controls menu.

![](/files/1rACYKuAErruFPauXCA8)

This will save the current state.&#x20;

</details>

<details>

<summary>Step 2: Download </summary>

To download the configuration, annotated or masked image one can click the download menu button from Controls menu. It will expand the menu and show respective buttons.&#x20;

![](/files/Jyi87IJp2hK2E39gbxmy)

After clicking configuration menu, a json file with configuration is downloaded. Here's the content of the downloaded JSON file.

```json
{
   "bianchi.jpeg":{
      "configuration":[
         {
            "image-name":"bianchi.jpeg",
            "regions":[
               {
                  "region-id":"7071021156029009",
                  "image-src":"http://annotate-lab.onrender.com/uploads/bianchi.jpeg",
                  "class":"Tyre",
                  "comment":"Back Tyre",
                  "tags":"",
                  "rx":[
                     0.05460252542288541
                  ],
                  "ry":[
                     0.3497771621890547
                  ],
                  "rw":[
                     0.35672614208955233
                  ],
                  "rh":[
                     0.5774993194029854
                  ]
               }
            ],
            "color-map":{
               "Tyre":[
                  244,
                  67,
                  54
               ]
            }
         }
      ]
   }
}

```

If we download the   annotated and masked image, we will get following images respectively.

![](/files/nc59j5ybtPrrzi0EplKS)![](/files/iuGTf5RrwIPxl82uMvYm)

</details>


# Ripe and Unripe Tomatoes Dataset

This dataset contains annotated images of tomatoes at various stages of ripeness. It is designed to support research and development in agricultural automation, specifically for training machine learning models to distinguish between ripe and unripe tomatoes. The dataset includes annotated images created using an [annotation lab](https://github.com/sumn2u/annotate-lab), ensuring precise and accurate labeling of ripeness status.

<figure><img src="/files/KeTzyExVCgB66jwGIthl" alt=""><figcaption><p>Ripe and Unripe Dataset</p></figcaption></figure>

The dataset is available on  [Kaggle](https://www.kaggle.com/datasets/sumn2u/riped-and-unriped-tomato-dataset/). . and consists of a total of 177 images. The class distribution shows 429 ripe and 440 unripe images, with 33 images classified as mixed.

<figure><img src="/files/uVIAaSrktnsIsPXbMuYA" alt=""><figcaption><p>Class distribution of ripe and unripe images</p></figcaption></figure>

<figure><img src="/files/aFYuYxHzGqVTQL6fayCx" alt=""><figcaption><p>Image counting both ripe and unripe tomatoes</p></figcaption></figure>

Some of the annotated image samples are shown below:

<figure><img src="/files/Ti6nanrbcejpxux7nMpx" alt=""><figcaption><p>Annotated Image Samples</p></figcaption></figure>


# Auto Bounding Box Selection with Segment Anything Model (SAM)

Selection of bounding box automatically is made possible with the[Segment Anything Model (SAM)](https://segment-anything.com/) . One can toggle this feature from the configuration of server and client. When enabled, a wand icon will appear in the toolbar. Clicking the wand icon will initiate auto-annotation and display the results

<figure><img src="/files/nPA2f1t3GszUFEeBJt2L" alt=""><figcaption><p>Auto Bounding Box Selection</p></figcaption></figure>

The result of the above auto bouding box selection is shown below.

<figure><img src="/files/QPhYmHXianIuskBxNF0y" alt=""><figcaption><p>Auto Annotation Result.</p></figcaption></figure>

{% hint style="warning" %}
Annotation times may vary depending on the machine and processing power. The server will take some time to boot on the initial run as it downloads the model file. Subsequent runs will use the already downloaded file, reducing the startup time.
{% endhint %}


# Troubleshooting

* Ensure that both the client and server are running.
* Check the browser console and terminal for any errors and troubleshoot accordingly.
* Verify that dependencies are correctly installed.

{% hint style="info" %}
If you encounter any bugs or issues while using Annotate-Lab, please report them by opening an issue in the GitHub repository. Include detailed information about the problem and steps to reproduce it.
{% endhint %}


# License

MIT License

This project is detached from idapgroup's react-image-annotate, which is licensed under the MIT License, and it uses some work from image\_annotator.

Original work (react-image-annotate) Copyright (c) 2019 WorkAround Online Inc Modified and distributed under the MIT License by Suman Kunwar, 2024.

Permission is hereby granted, free of charge, to any person obtaining a copy of this software and associated documentation files (the "Software"), to deal in the Software without restriction, including without limitation the rights to use, copy, modify, merge, publish, distribute, sublicense, and/or sell copies of the Software, and to permit persons to whom the Software is furnished to do so, subject to the following conditions:

The above copyright notice and this permission notice shall be included in all copies or substantial portions of the Software.

THE SOFTWARE IS PROVIDED "AS IS", WITHOUT WARRANTY OF ANY KIND, EXPRESS OR IMPLIED, INCLUDING BUT NOT LIMITED TO THE WARRANTIES OF MERCHANTABILITY, FITNESS FOR A PARTICULAR PURPOSE AND NONINFRINGEMENT. IN NO EVENT SHALL THE AUTHORS OR COPYRIGHT HOLDERS BE LIABLE FOR ANY CLAIM, DAMAGES OR OTHER LIABILITY, WHETHER IN AN ACTION OF CONTRACT, TORT OR OTHERWISE, ARISING FROM, OUT OF OR IN CONNECTION WITH THE SOFTWARE OR THE USE OR OTHER DEALINGS IN THE SOFTWARE.


